
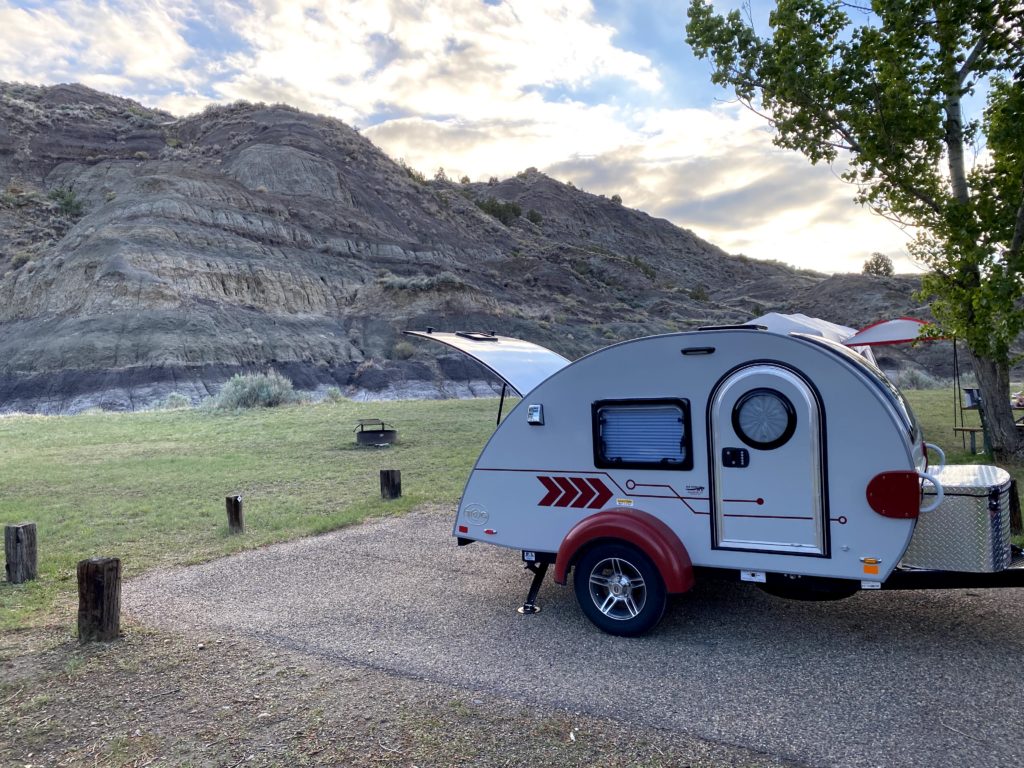
Teardrop trailer camping is the perfect combination of comfort, simplicity, and freedom. You sleep in a real bed off the ground, cook from a real kitchen galley, and wake up wherever you parked, no reservations at a hotel, no hauling a giant rig. I’ve been camping in my NuCamp T@B 320 for a little over a year, and a T@G before that, and this guide covers everything I’ve learned about teardrop camping from first hookup to winter storage.
Whether you just bought your first teardrop or you’re still researching, this is the only
🛒 Shop my favorite teardrop camping gear list at the bottom of this page.
Disclaimer: I’m sharing my research and experience with my teardrop campers. Always check your owner’s manual and camper’s official documentation for model-specific guidance. As an affiliate I earn a small commission from qualifying purchases at no additional cost to you.
What’s in This Guide
- Hooking Up Your Teardrop Camper
- Setting Up Camp
- Water System Essentials
- Power System Essentials
- Sleeping Comfortably
- Storage Inside the Teardrop
- Safety and Emergency Preparedness
- Bathroom Options
- Side Tents and Screen Houses
- Kitchen and Cooking
- Breaking Down Camp
- Storing Your Teardrop Camper
- How to Winterize Your Teardrop Camper
- How to De-Winterize Your Teardrop Camper
- Sanitizing Your Water Tank
- Teardrop Camper Essentials Buying Guide
Hooking Up Your Teardrop Camper
Before your first trip, make a hookup checklist and keep it in your tow vehicle. Missing a step — like forgetting to crank up the stabilizer jacks — is a lot easier to do than you’d think. Here is the sequence I follow every time:
- Install the correct ball and hitch on your tow vehicle and secure with a locking pin.
- Use the trailer jack to raise the coupler above the hitch ball, then back your vehicle into position.
- Lower the coupler onto the ball and lock it. Crank the trailer up slightly to confirm it’s secure. (sometimes I drive forward a couple of inches to get it to sit correctly).
- Cross the safety chains and attach to the hitch receiver — crossing them creates a basket to catch the trailer tounge if it detaches.
- Attach the breakaway cable to the hitch receiver. Make sure it’s not slack or kinked.
- Crank the jack up so the wheel or foot clears the ground. Remove the jack wheel and store it somewhere accessible.
- Plug in the 7-pin connector. If you’re using a Bluetooth brake controller, plug that in first.
- Remove wheel chocks and confirm all stabilizer feet are cranked up.
- Turn on your tow vehicle lights and test the trailer brake lights and turn signals.
- Open all blinds and lock all windows and the fan cover. Secure any loose items inside.
- Confirm propane is off at the tank and the galley door is latched.
- Double-check every door and latch. I lock the bolt first, then the handle. I once had a door open while driving and it’s not something you want to experience.
- Walk around the full trailer before pulling out.
Stop after about a mile to do a quick visual check — everything tends to settle after the first bit of driving.
Related: How to Back Up a Teardrop Trailer
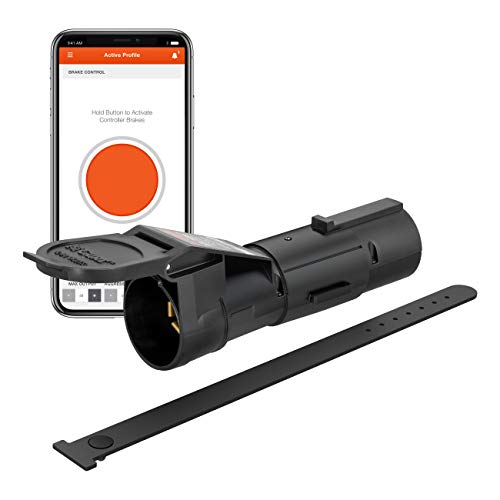
with Bluetooth-Enabled Smartphone Connection, Proportional, Black Plastic, 9 x 9 x 3 inches,
Setting Up Camp
You’ve made it to camp, you’ve backed in your trailer (yay!) and now you are ready to unhook and set up!
Here are the steps to setting up camp with your
- Check for level. I usually am not a perfectionist on being level, I just want to make sure I can sleep without falling out of bed or all the blood rushing to my head. Add leveling blocks while still hooked to the tow vehicle if needed. Make sure you can reach hookups from your chosen spot.
- Place wheel chocks in front of and behind the trailer tires.
- Reinstall the jack wheel or foot and lower to the ground.
- Unplug the 7-pin connector from the tow vehicle. Even if you’re staying hitched, this prevents a slow battery drain.
- Unhook the safety chains and breakaway cable.
- Release the coupler from the ball.
- Crank the trailer up until it clears the ball and move the vehicle forward.
- Use the tongue jack to level the trailer front to back.
- Lower the stabilizer jacks. Remember, these stabilize, they don’t level. Store the crank somewhere you’ll easily find it.
- Hook up to electric: power off at the pedestal, connect your cord to the camper, add your surge protector, plug into the pedestal, power on.
- Hook up to water if available (see water section below).
- Set up your 12V refrigerator or cooler in the galley.
- Turn on propane slowly to prevent air bubbles.
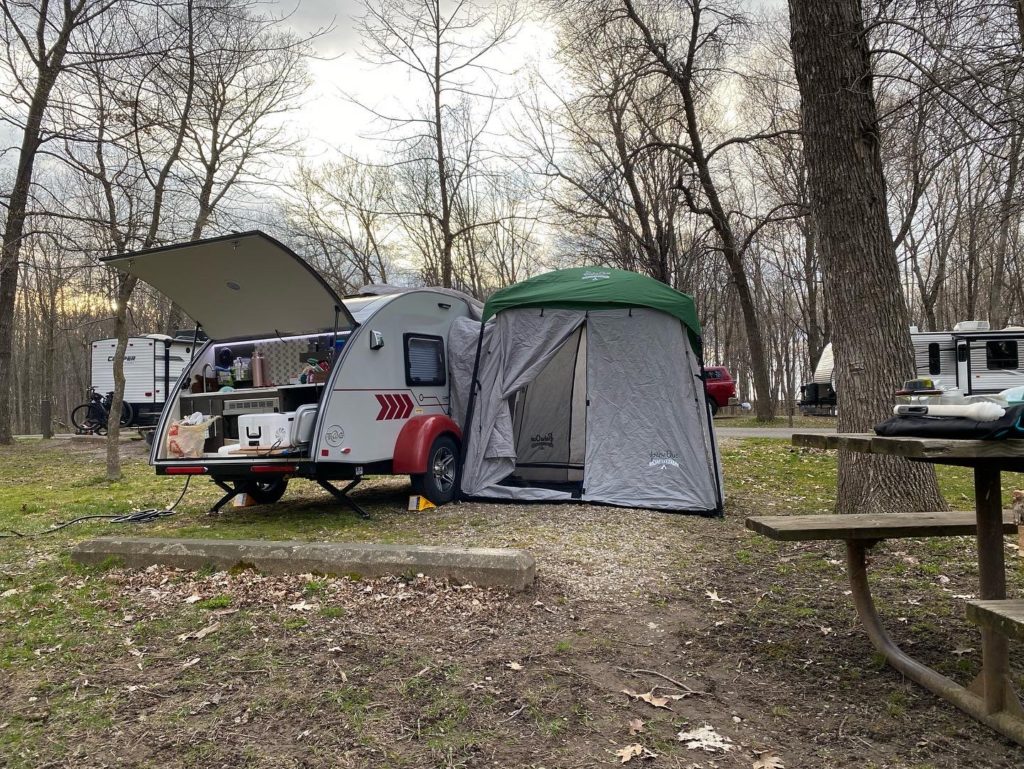
- Set up side tent or screen house.
- Arrange chairs, rugs, and outdoor lighting.
- Add hitch and wheel locks.
- Open the fan cover and set heat, A/C, or fan to your preference.
- Make up the bed.
- Light the Thermacell outside if you’re in mosquito territory.
📖 Related: How to Keep Mosquitoes Out of Your Teardrop Camper

Includes 12-Hours of Protection; Scent-Free, No Flame Citronella Candle Alternative
Water System Essentials
If your teardrop has a tank and sink, you’ll need a few things to either connect to campground water or fill your tank when there are no hookups.
Biodegradable camp soap — safe for the environment, works for dishes and personal hygiene.
Water tank filler — for filling your tank from a spigot. Keep this dedicated to tank filling only to avoid contamination.
Water pressure regulator — protects your RV water lines from high campground pressure.
Drinking water hose and inline filter — I rarely hook up to campground water directly, but I carry both as backup.
Collapsible wash basin — useful for dishes, washing up, or emergency water carrying.

Power System Essentials
Most teardrop campers use 30-amp power. Your battery typically handles lights, the fan, radio, and USB charging. To run 110V appliances such as air conditioner, microwave, heater, you will need shore power or a generator.
At a campsite with electric hookups: Use a surge protector every time. Bad power at campground pedestals is more common than you’d think — reverse polarity, open ground, voltage drop. I had an EMS surge protector hardwired into my T@B; if yours isn’t hardwired, a portable unit is non-negotiable. You’ll also want a 30-amp to 15-amp adapter for charging at home.

Portable EMS-PT30X RV Surge Protector , Black
Without electric hookups:
For running the A/C or microwave without hookups, you’ll need a gas generator. Always check campground rules — most enforce generator quiet hours.
If you have a 7-pin connector, driving while towing charges your camper battery.
A solar panel — either built-in or portable — keeps the battery topped off during the day.
A portable power station like the Goal Zero Yeti is excellent for phone charging and running a USB fan without drawing from the camper battery.

This 6th generation 499 watt hour compact and rugged power station is designed for all your outdoor adventures. It’s versatile enough to help out during a power outage at home and tough enough to handle mud, dirt, dust, water, and more when you head out.
Sleeping Comfortably in your Teardrop Camper
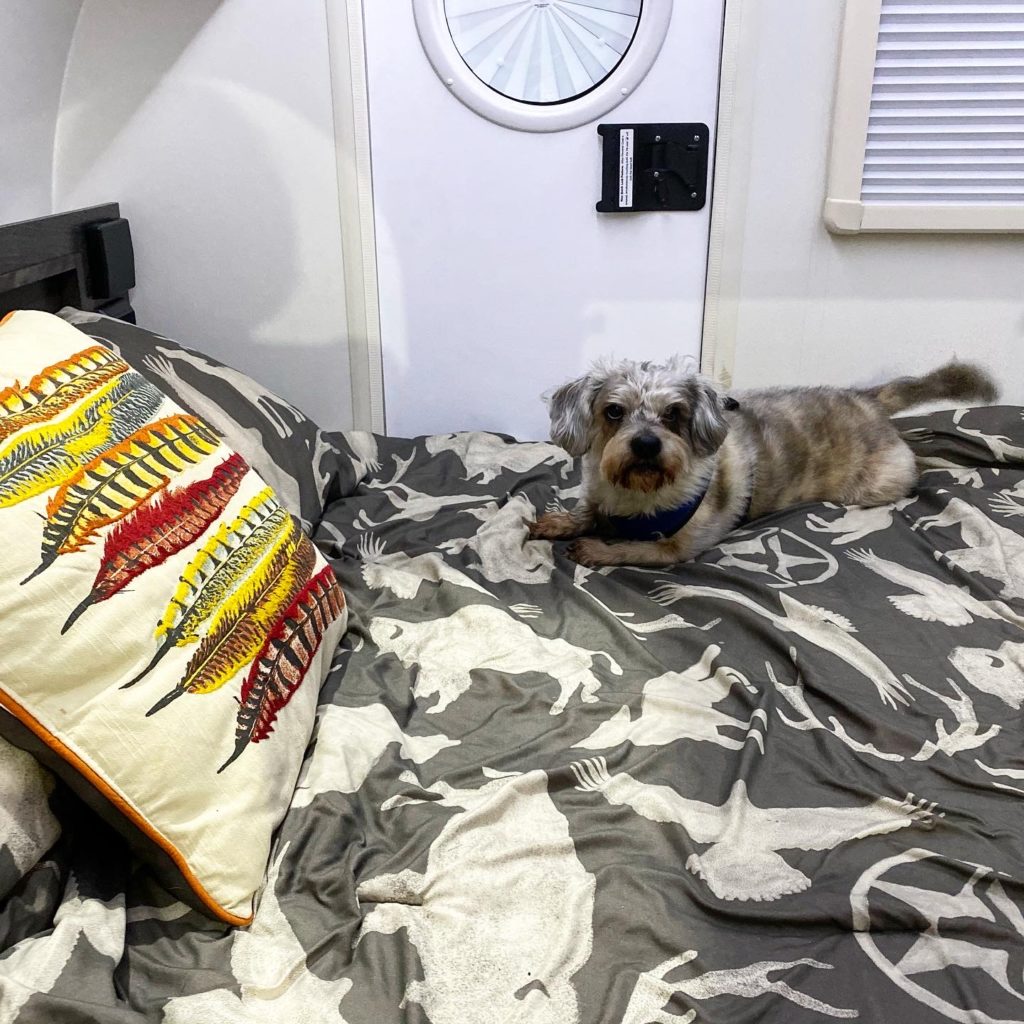
Sleeping off the ground in a real bed is one of the best things about teardrop camping. A few tips for the best night’s sleep:
- Keep a window or the overhead fan cracked slightly to reduce condensation buildup overnight.
- In my T@G, I had two separate mattresses. I could push them together for a full-size bed or stack them to free up floor space for a small table and chair — a surprisingly useful configuration for solo trips. The T@B also gives me multiple single or double sleeping options.
- A mattress topper is popular with some teardrop campers, though I’ve never needed one.
- Make your bed before you set up the rest of camp — it’s easy to forget and you’ll be tired later.
📖 Related: 5 Things You Need to Stay Warm in Your Teardrop Trailer
Storage inside the Teardrop
Storage is one of the biggest challenges in a small camper, and one of the most rewarding puzzles to solve. The key is categorizing by frequency of use and keeping your most-needed items accessible, and outside items near the door.
📖 Watch: Teardrop Camper Storage Tips and Tricks + Full Gear List
Teardrop Camper Emergency and Safety Considerations
I’ve always felt safe in the campgrounds I visit, but preparation matters. Here’s what I keep in my T@B year-round:
Personal safety:
- Bear spray — works on bears and, if needed, on humans. Do not spray it inside the camper.
- Car keys next to the bed so you can trigger your vehicle alarm from inside if you need to draw attention. I keep a set of all keys in a lockbox in the front storage bin.
Animal safety:
- In bear country, store all food and water in your tow vehicle or bear locker, not the camper.
- Keep the galley door closed when not in use to discourage raccoons and other curious animals.
Essential safety gear to carry at all times:
- Headlamp (the most overlooked and most useful piece of camping gear)
- NOAA weather radio — a cell signal-independent weather alert system
- First aid kit in both the camper and tow vehicle
- Spare tire for the trailer — inflated and in good condition
- Portable jump starter and tire compressor
- Phone charger in both the camper and tow vehicle
- Smoke alarm, CO detector, and fire extinguisher inside the camper
- Rain jacket, packable down jacket, hat and gloves — even in summer
- Garmin inReach Mini or similar satellite communicator for areas without cell service
Related: 5 Tips to Help Keep You Safe on a Road Trip

(Model A3) Portable Power Bank, Solar Charging, Hand Crank & Battery Operated, SOS Alarm, Motion Sensor Setting, AM/FM & Flashlight for Outdoor Emergencies
Teardrop Camper Bathroom Options
Many teardrop campers don’t have an onboard bathroom. Here’s how to handle it:
Campgrounds with a bath house: This is my standard setup. Choose a site that’s not far from the facilities. My T@B 320 has a small cassette toilet, I typically only use that at night.
Without a bath house — if you don’t have a bathroom in our camper here are some options:
- Shower tent — gives you a private space for showering, changing, or using a portable toilet. Many campgrounds restrict these if a bath house exists, so check rules in advance.
- Portable toilet — a folding option that stores flat when not in use is ideal for teardrop-sized storage. Keep it in the side tent for easy access.
- Solar shower — fill with water and leave in the sun. By late afternoon you’ll have warm water for washing hair or rinsing off. Simple and effective.
Related: How to Build a Portable Bathroom for Camping

Oversize Space Privacy Tent Portable Outdoor Shower Tents for Camping with Floor Changing Tent Dressing Room Easy Set Up Shower Privacy Shelter 1 Room/2 Rooms Toilet Tent
These liners are for a portable toilet, I also use them in my cassette toilet at times for easy clean up.

Side Tents and Screen Houses
A side tent or screen house transforms a teardrop campsite from just a sleeping space into a real living area. This is especially important for solo women camping — it gives you a private, protected outdoor space.
Side tents attach directly to your camper over the galley or along the side. They’re great for rainy days, extra gear storage, and using as a changing or bathroom area.
Screen houses are freestanding and set up nearby. My favorite for teardrop camping is the CLAM Quick-Set Traveler — it pops up in seconds, is genuinely weatherproof, and is the right scale for solo or couple camping.
Related: 5 Best Tents for Teardrop Trailers
The Clam Quick Set Traveler is a small and easy to use pop up screen house perfect for solo camping or a couple. This is a high quality screen house and withstands the weather well and perfect for teardrop trailer camping. Click here for more information and set up video.

Freestanding screen room. Sets up in seconds and provides full bug protection. Add wind panels for rain and privacy coverage.
Teardrop Camper Kitchen and Cooking
The galley is one of the best features of a
A few things I’ve learned after years of teardrop cooking:
Keep meals simple. This isn’t a competition kitchen — it’s camp. One-pot meals, foil packets, and things you can prep at home before you leave will make your trips dramatically more relaxing.
I keep a small butane stove in addition to my galley stove for anything greasy — bacon, burgers, anything that splatters. Easier to cook on the picnic table and keep the galley clean.
A wind screen is a necessity when using the outside galley stove. They are cheap and fold up small for storage.
A 12V refrigerator is worth the upgrade over a cooler. No ice to buy, no melt water, consistent temperature.
Counter space is the real constraint in a teardrop galley. A small folding prep table solves this immediately.
Check out these articles on Teardrop Camper Galley Basics, Teardrop Camper Kitchen Essentials and Best ways to make coffee in your teardrop camper!

Breaking Down Your Teardrop Camper Campsite
A consistent breakdown routine means nothing gets left behind and nothing shifts in transit. Here’s my sequence:
- Power off at the pedestal and unhook the power cord.
- Inside the camper: close and lock the fan cover, lock all windows, put shades down.
- Secure all loose items inside the trailer.
- Lay a sheet over the bed before loading in side tent and other gear if you stow them in the camper — keeps road dust off the bedding.
- Take down any tents or screen houses and stow.
- Bring in rugs, chairs, and all outside items.
- Remove the cooler or refrigerator from the galley and plug the fridge into a power pack in the tow vehicle if your refrigerator is not built-in.
- Turn off water and disconnect from camper.
- Turn off the propane tank.
- Crank up all stabilizer jacks and store the crank.
- Hitch up to the tow vehicle using the sequence from the hookup section above.
- Empty tanks or cassette toilet at campground dump station.
Storing your Teardrop Camper
Garage storage is ideal. Many teardrop campers fit in a standard one-car garage, which protects the exterior, prevents UV damage, and adds a layer of security. If you can make this work, do it.
Outdoor storage with a cover is the next best option. Look for a cover made specifically for your camper model. Pahaque makes several sizes for teardrop trailers and small campers — browse their cover options here.
When I store my camper, I add a hitch lock and wheel lock and crank down the stabilizers for security.
How to winterize your Teardrop Camper
If your teardrop has any plumbing — a sink, outdoor shower, water tank — you must winterize before temperatures drop below freezing. These two methods are the most common:
Method 1: Blow out the lines Use an air compressor with an RV blow-out plug to force all water out of the lines. No antifreeze needed.
Method 2: Antifreeze Use a pump converter kit to fill the lines with propylene glycol RV antifreeze. Make sure you’re using propylene glycol — it’s non-toxic, which matters if you use your water for drinking or cooking.
Check with your camper manufacturer for their preferred method before your first winterization.
Additional winterization steps:
- Leave cabinet doors slightly open inside the camper to allow air circulation.
- Connect a trickle charger to maintain battery health, or remove the battery and store it indoors.
- Remove all food, spices, soap, bug spray, sunscreen, and toiletries — anything that can freeze or attract mice.
How to De-Winterize Your Teardrop Camper
If you used the antifreeze method, de-winterizing is straightforward:
- Connect a garden hose to your city water inlet.
- Run water through every faucet until the antifreeze is completely flushed — the water should run clear with no pink tint.
- Sanitize the tank (see section below) before your first trip of the season.
- Reconnect or reinstall the battery and confirm it’s holding a charge.
- Check propane connections and test all appliances before you leave on your first trip.
Your camper manufacturer will have specific instructions for your model — always follow those over general guidance.
Sanitizing your teardrop camper water tank
After de-winterizing — and at least once a season — sanitize your fresh water tank before drinking from it.
The standard method uses a diluted bleach solution: roughly ¼ cup of unscented household bleach per 15 gallons of tank capacity. Fill the tank, run water through all faucets until you can smell bleach, let it sit for several hours, then drain completely and flush with fresh water until the bleach smell is gone.
Check your owner’s manual for the exact ratio recommended for your tank size.
This video from Travels with Delaney walks through the full sanitizing process on a T@B 400 — worth watching before your first time.
Teardrop Camper Essentials Buying Guide
These are the products I use and recommend for teardrop trailer camping — tested in my teardrop over multiple seasons of Midwest camping. I’ve organized them by category so you can shop for exactly what you need.
Hookup and Towing
with Bluetooth-Enabled Smartphone Connection, Proportional, Black Plastic, 9 x 9 x 3 inches,
Power
Portable EMS-PT30X RV Surge Protector , Black

This 6th generation 499 watt hour compact and rugged power station is designed for all your outdoor adventures. It’s versatile enough to help out during a power outage at home and tough enough to handle mud, dirt, dust, water, and more when you head out.


with LED Lantern, Rechargeable Battery Operated Oscillating with Remote Hook, Portable Tent Fan with Timer, 4 Speeds for Outdoor RV Jobsite Power Outage, Green

Super Quiet Portable Industrial Inverter Generator with CO-Minder - 49-State
Water


Biodegradable Environmentally Safe All Purpose Cleaner, Camping Hiking Backpacking Travel Camp (8oz)